Release 2.1.7.3
A43822_4
Library |
Product |
Contents |
Index |
| Oracle
Video Server Administrator's Guide: Windows NT Release 2.1.7.3 A43822_4 |
|
Topics covered in this chapter are:
The Oracle Media Data Store (MDS) is an optimized filesystem designed to store multimedia data and deliver it in real time to multiple clients. Access to the MDS is controlled by mdsdirsrv (MDS directory server) and the MDS configuration is defined by the VOLTAB configuration file.
For information about the MDS and how it works, refer to the Oracle Video Server System Tour. For information on the mdsdirsrv server process or the VOLTAB configuration file, refer to the Oracle Video Server Utilities User's Guide.
When you use either the MDS or stream service utilities, you can enter a full pathname to refer to any MDS file. You may find it easier, however, to set the path in the MDS.CWD environment variable, and omit the volume path in the command itself. The MDS.CWD environment variable prepends MDS path information to a filename that is specified without a path.
These examples use vstagprint to print the tag information in the tag file oracle1.mpi from the MDS volume video.
First, use mdsdir to show all available MDS volumes and files on the server:
C:> mdsdir
Volume /mds/movies (rw): 2 matches
cover.mpg          cover.mpi

Volume /mds/video (rw): 2 matches
oracle1.mpg         oracle1.mpi
This example uses MDS.CWD as the path name to find the tag file oracle1.mpi:
C:> set MDS.CWD=/mds/video
C:> vstagprint oracle1.mpi
Tag file version: 3.4
Current code is version 3.4, back-compatible to version 3.4
...
In this example, MDS.CWD is pointing to the wrong volume (named movies), therefore the tag file oracle1.mpi is not found:
C:> set MDS.CWD=/mds/movies
C:> vstagprint oracle1.mpi
mkctPrintTagFile: cannot open tag file oracle1.mpi
error while attempting to print tag file
error occurred in vstagprint, exiting
In this example, MDS.CWD is set to the volume video, but
the user specifies the volume movies. If you provide an explicit
MDS volume path it will
override MDS.CWD:
C:> set MDS.CWD=/mds/video
C:> vstagprint /mds/movies/oracle1.mpi
Tag file version: 3.4
Current code is version 3.4, back-compatible to version 3.4
...
In this example, MDS.CWD is not set and the MDS path is not specified. This produces the following error message:
C:> set MDS.CWD=
C:> vstagprint oracle1.mpi
mkctPrintTagFile: cannot open tag file oracle1.mpi
error while attempting to print tag file
error occurred in vstagprint, exiting
You can mount MDS volumes in the following read-write modes:
A volume mounted in read-write mode allows mdsdirsrv to both read and write to the volume. To perform administrative tasks involving an MDS volume-such as loading content-the volume must be mounted in read-write mode.
A volume mounted in read-only or inconsistent read-only mode allows mdsdirsrv to read but not write to an MDS volume.
Multiple mdsdirsrv processes can mount an MDS volume in inconsistent read-only or read-only mode. If you are running multiple mdsdirsrv processes, only one mdsdirsrv process can mount an MDS volume in read-write mode.
A volume mounted in inconsistent read-only mode allows mdsdirsrv to read a volume that is being modified by a read-write mode mdsdirsrv process from a different server. The inconsistent read-only mdsdirsrv process will receive periodic updates about the volume changes made by the read-write mdsdirsrv process, however, at times the inconsistent read-only mdsdirsrv process will not see the correct volume image. When this happens the inconsistent read-only mdsdirsrv process may allow its clients to open up files that do not actually exist and whose contents are indeterminate. In addition, it may not know about files that have been recently created.
In general, you should not have more then one mdsdirsrv process accessing an MDS volume unless you are debugging the OVS.
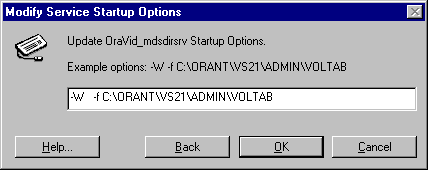
The MDS directory server (mdsdirsrv) is configured using the OVS Configuration Utility. For information on the OVS Config Utility refer to Modifying Oracle Video Server Parameters in Chapter 3, "Operating the Oracle Video Server." Figure 5-1 shows the dialog box used to modify mdsdirsrv parameters.
The following examples show the syntax used by mdsdirsrv to mount MDS volumes using varying read-write modes.
This example uses -W to mount all volumes listed in the VOLTAB file in read-write mode:
-W -f C:\ORANT\VS21\ADMIN\VOLTAB
This example mounts all volumes in read-write mode with -W except for the volume video3, specified with the -l option, which is mounted in read-only mode:
-W -l video3 -f C:\ORANT\VS21\ADMIN\VOLTAB
This example, mounts all volumes in read-only mode with -L, except for the volume video, specified with the -w option, which is mounted in read-write mode:
-L -w video -f C:\ORANT\VS21\ADMIN\VOLTAB
In this example, the volume video, specified with the -i option, is mounted in inconsistent read-only mode. If a volume is mounted by two servers, only one server can mount the volume in read-write mode, while the other server must mount the volume in inconsistent-read-only mode. Note that if a volume is mounted by two servers, video cannot be streamed from that volume with real-time constraints as both OVS environments are unaware of each other and will compete for MDS bandwidth:
-i video -f C:\ORANT\VS21\ADMIN\VOLTAB
To change the name of an MDS volume, without destroying its contents, you must re-initialize the volume's specification with the mdsvolinit utility and retag all content with vstag. This example changes the MDS volume name from video (as shown below) to volume1:
video maxbw=55,striped,width=32k,raidsize=4

 \\.\PhysicalDrive{1,4,7,10,2,5,8,11,3,6,9,12}
volume1 maxbw=55,striped,width=32k,raidsize=4

 \\.\PhysicalDrive{1,4,7,10,2,5,8,11,3,6,9,12}
Do not use the -t option, which will overwrite the volume's table of contents and erase all content.
C:> mdsvolinit -s -f C:\ORANT\VS21\ADMIN\VOLTAB volume1

Do you really want to change attributes of volume 'volume1'? (yes, no)
yes
Attributes of volume 'volume1' recorded.
C:> vstag -E mpi /mds/volume1/oracle1.mpg
now Tagging /mds/volume1/oracle1.mpg into /mds/volume1/oracle1.mpi
Alternatively, you can use vstagpatch to modify the tag files to point to the new location of the MPEG files. This will save time if the content files are very large.
C:> vstagpatch -c -n /mds/volume1/oracle1.mpg

/mds/volume1/oracle1.mpi
Invariably, you will need to add additional storage capacity to the OVS as your video library grows. Since you cannot add disks to an MDS volume without erasing the data it contains, you will need to create additional volumes. Follow these steps to add volumes to an existing MDS system:
video maxbw=55,striped,width=32k,raidsize=4
\\.\PhysicalDrive{1,4,7,10,2,5,8,11,3,6,9,12}

video2 striped,width=32k,raidsize=4
\\.\PhysicalDrive{13,16,19,22,14,17,20,23,15,18,21,24}
For information on the VOLTAB file and its syntax, refer to the Voltab section of Chapter 7, "Oracle Video Server Components Reference" later in this guide.
The above example shows a VOLTAB entry divided across two lines. When editing a VOLTAB entry it should all be on one line. The only division of lines should occur when your text editor wraps from one line to the next. Do not place a hard return in a VOLTAB entry.
OMN allows communication to take place among the OVS components so that mdsvolinit can write to the new volume.
C:> mdsvolinit -s -t -f C:\ORANT\VS21\ADMIN\VOLTAB video2
mdsvolinit writes information from the VOLTAB file to the disks used by the volume video2. Note that the -s and -t options used in this example should only be used to initialize a new MDS volume. Using this combination of options erases all data contained by the disks.
C:> mdsdir -f /mds/video2
Volume /mds/video2 (rw): 1 match
2400 MB's of free space in 1 fragment(s)
largest free block is 2400 MB's
The volume created is a non-real-time volume since no maxbw (maximum bandwidth) value is specified in the VOLTAB entry. You may wish to load video content into the new volume at this time. Loading content into a non-real-time volume gives more bandwidth to the utilities used to copy and tag video content. To create a real-time volume, which is designed to stream video and audio content with real-time constraints, continue with the next section.
To create a real-time MDS volume, where access to the volume is limited to a predefined maximum to ensure quality of service, you must obtain the maxbw value. maxbw specifies the maximum rate at which all OVS server processes and clients can together read and/or write to an MDS volume.
Follow these steps to obtain the correct maxbw value for your MDS volume and mount the MDS volume in real-time mode.
C:> mdsvolstat -a -f C:\ORANT\VS21\ADMIN\VOLTAB video2
Recommended maxbw setting for volume video2 is: 55 Mbps
For more information on mdsvolstat refer to the "Media Data Store Utilities" chapter of the Oracle Video Server Utilities User's Guide (online only).
C:> copy VOLTAB VOLTAB_NONREALTIME
This gives you volume definitions for both a real-time and a non-real-time MDS volume. When you are operating the OVS for strictly administrative functions (such as loading and tagging content) you should use the non-real-time file. This will allocate more bandwidth to utilities such as mdscopy and vstag.
video2 maxbw=55,striped,width=32k,raidsize=4

 \\.\PhysicalDrive{1,4,7,10,2,5,8,11,3,6,9,12}
The above example shows the VOLTAB entry divided across two lines. When editing a VOLTAB entry it should all be on one line. The only division of lines should occur when your text editor wraps from one line to the next. Do not place a hard return in a VOLTAB entry.
You can now start the OVS with the ovsstart script using the modified VOLTAB file (see step 1). The MDS volume will be mounted in real-time mode.
C:> mdsdir -c /mds/video
Volume /mds/video (rw): 55 out of 55 Mbps available
Performing file operations on the MDS, especially removing and truncating files, can leave gaps between files in your MDS volumes. Although the Media Data Store process (mdsdirsrv) stores other files in these gaps if they fit, this fragmentation results in wasted disk space. You can defragment MDS volumes by running mdsdirsrv with the defragmentor component enabled. Because the performance of the MDS is not affected by disk fragmentation, defragmenting the MDS reduces potentially wasted disk space only. It does not improve performance.
You can use the mdsdirsrv process to start the defragmentor processes. When the defragmenting is complete, all files in the defragmented volumes are stored contiguously. The mdsdirsrv process then terminates.
You cannot read from or write to a volume while an mdsdirsrv process defragments it:
The defragmentor operates on one file at a time and writes a message to the screen for each file. If the defragmentor fails or is abnormally terminated, only one file can potentially be left corrupted. You can identify this file from the messages or with the mdsdir utility. You can then remove it with the mdsdelete utility and reload it with the mdscopy or mdstar utility. For information on these utilities, see the chapter "Media Data Store Utilities" in the Oracle Video Server Utilities User's Guide (online only).
Start mdsdirsrv with the defragmentor with this syntax:
mdsdirsrv -W -d -f C:\ORANT\VS21\ADMIN\VOLTAB
where:
-W mounts all volumes specified in the VOLTAB file in read-write mode, except those volumes specified by -i or -r.
For more information on mdsdirsrv modes, refer to the mdsdirsrv section of Chapter 7, "Oracle Video Server Components Reference."
-d runs the defragmentor component of mdsdirsrv.
-f identifies the VOLTAB file that specifies the volumes to be defragmented.
This example command starts mdsdirsrv with the defragmentor:
C:> mdsdirsrv -W -d -f C:\ORANT\VS21\ADMIN\VOLTAB
The mdsdirsrv process defragments the volumes specified in the VOLTAB file in the directory C:\ORANT\VS21\ADMIN on the server.
By checking the OVS log files, as described in Chapter 6 "Monitoring the Oracle Video Server," you might learn that a hard disk has failed. Disk sparing allows you to replace a failed hard disk without removing the OVS from service. To use disk sparing you must allow for a spare disk during the MDS configuration process. The spare disk for a volume is specified in the VOLTAB file. Refer to the VOLTAB section of Chapter 7, "Oracle Video Server Components Reference" for more information on creating a VOLTAB file a spare disk definition.
Follow these steps to transfer the data from a failed disk to a spare:
mdsdiskmode -f C:\ORANT\VS21\ADMIN\VOLTAB -s spare-disk

failed-disk
C:> mdsrebuild -f C:\ORANT\VS21\ADMIN\VOLTAB failed-disk
Note that you specify the name of the failed disk when rebuilding data to the spare. Using mdsdiskmode causes the spare to be recognized in place of the failed disk by mdsdirsrv.
The spare disk now takes the place of the failed disk until administrative downtime can be arranged to install a new disk.
The following example shows how to use a spare disk in the event of a disk failure.
Assume the VOLTAB file defines the volume video with 12 disks in 3 RAID sets of 4 disks each, and one spare.
video maxbw=55,striped,width=32k,raidsize=4 spares=\\.\PhysicalDrive13
\\.\PhysicalDrive{1,4,7,10,2,5,8,11,3,6,9,12}
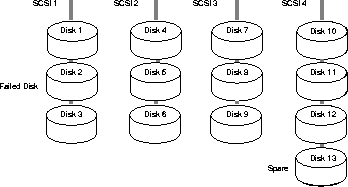
Suppose you receive a message that the second disk in the first SCSI chain has failed. This disk is identified as Disk 2. The spare disk is identified as Disk 13. This disk is on the fourth SCSI chain of the volume video.
To enable the spare disk and transfer data from the remaining disks to the spare, follow these steps:
C:> mdsdiskmode -f C:\ORANT\VS21\ADMIN\VOLTAB -s \\.\PhysicalDrive13
\\.\PhysicalDrive2
C:> mdsrebuild -f C:\ORANT\VS21\ADMIN\VOLTAB \\.\PhysicalDrive2
mdsrebuild reads the remaining disks in the RAID set to obtain their parity information. This information is used to reconstruct the data stored on the failed disk and write it to the spare.
When administrative downtime can be arranged, swap the failed disk with the rebuilt spare and replace the spare disk with a new unit. This saves you from having to reconstruct the data on the replacement disk.
C:> mdsdiskmode -f C:\ORANT\VS21\ADMIN\VOLTAB -u \\.\PhysicalDrive2
You must unspare a disk so that mdsdirsrv reads and writes to the correct disk, which is (Disk 2) and not the replacement spare disk (Disk 13).
Make sure to unspare the disk before starting mdsdirsrv. If you do not unspare the disk, it will not be recognized by mdsdirsrv as a usable disk.
|
Copyright © 1997 Oracle Corporation. All Rights Reserved. |
|