| Oracle Network Products Getting Started for Windows Platforms | Library |
Product |
Contents |
Index |
| Oracle Network Products Getting Started for Windows Platforms | Library |
Product |
Contents |
Index |
![]()
![]()
Verifying Oracle Network Products Setup
Before proceeding with Oracle Network Products configuration, ensure the necessary products have been installed on the server and each of the clients.
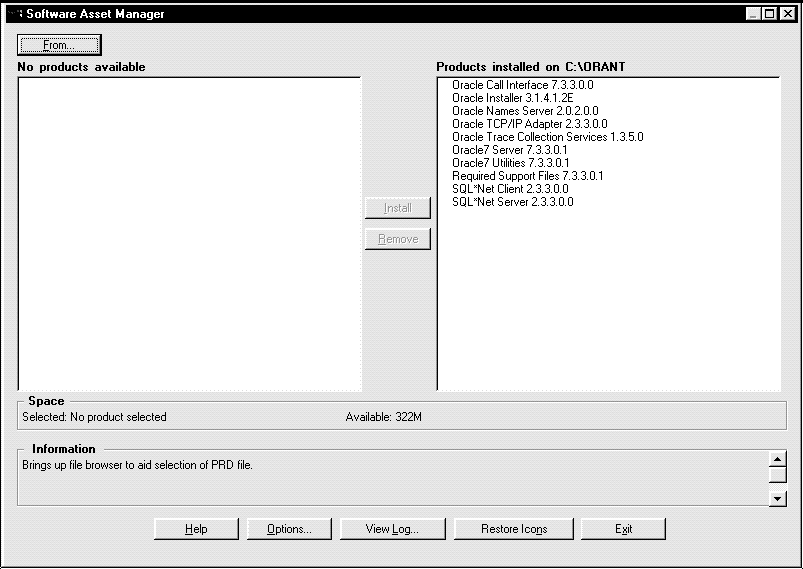
| On Your Server | On Your Client |
| SQL*Net Server and SQL*Net Client | SQL*Net Client |
| Protocol specific adapter | Protocol specific adapter |
| Oracle Names Server (optional) | Oracle Network Manager for Windows |
|
|
|
|
Choosing a Configuration Tool
Choosing a configuration tool depends upon whether or not your network uses Oracle Names.
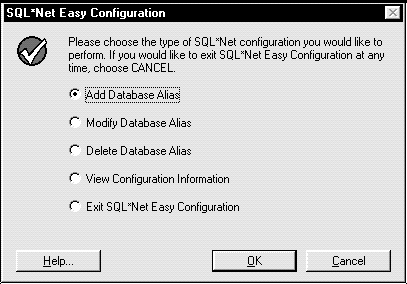
SQL*Net Easy Configuration
SQL*Net Easy Configuration makes configuration quick and simple by automatically creating configuration files needed by the networking products. Use SQL*Net Easy Configuration if:
Review the guidelines below before choosing either SQL*Net Easy Configuration or Oracle Network Manager:
| Oracle Protocol Adapter | Use SQL*Net Easy Configuration | Use Oracle Network Manager |
| TCP/IP | yes | yes |
| SPX | yes | yes |
| DECnet | no | yes |
| Named Pipes | yes | yes |
| NetBIOS | yes | yes |
| LU6.21 | no | yes |
| Bequeath | yes | no |
Understanding the Configuration Files
Oracle Network Products use the following configuration files:
| On Your Server | On Your Client |
| LISTENER.ORA | SQLNET.ORA |
| NAMES.ORA | TNSNAMES.ORA |
| SQLNET.ORA | TNSNAV.ORA |
| TNSNAMES.ORA |
|
Below is a description of the configuration files:
For samples and detailed descriptions of these files, see "Configuration Files."
A description of how the files are created is described below:
Configuring a Network Without Oracle Names
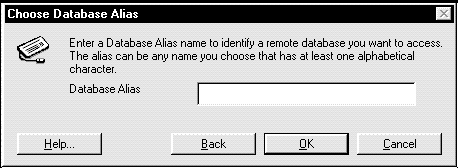
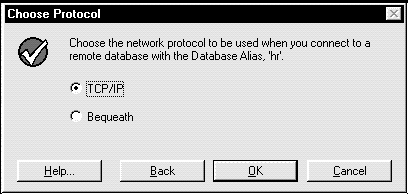
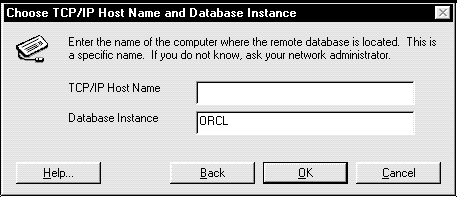
After you have installed the necessary Oracle network products, use SQL*Net Easy Configuration or Oracle Network Manager to create the TNSNAMES.ORA and regenerate SQLNET.ORA configuration files. Using SQL*Net Easy Configuration
|
|
|
|
To create the configuration files:
.
Continue to Step 4.
If you installed only one protocol adapter, the dialog box appropriate for your protocol adapter appears, as shown in Step 4. Skip to Step 5.
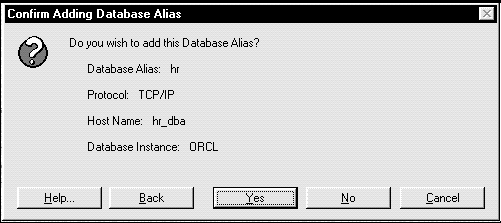
The configuration files are created in the ORACLE_HOME\NETWORK\ADMIN directory.
|
|
|
|
The SQL*Net Easy Configuration dialog box re-appears.
The SQL*Net Easy Configuration dialog box re-appears.
When using Oracle Network Manager, you:
|
|
To use Oracle Network Manager:
If you choose No, continue to Step 4.
| Server host_name contents | TCP_WORL contents |
| SQLNET.ORA | SQLNET.ORA |
| TNSNAMES.ORA | TNSNAMES.ORA |
| TNSNAV.ORA | TNSNAV.ORA |
| LISTENER.ORA |
Distributing Configuration Files
The generated server configuration files need to distributed to ORACLE_HOME\NETWORK\ADMIN on the server, and the client configuration files need to distributed to \ORACLE_HOME\NETWORK\ADMIN on all clients. Configuring a Network With Oracle Names
SQL*Net requires minimal configuration (TCP/IP, SPX and Named Pipes networks only) through Oracle Names. SQL*Net minimizes configuration by having:
|
|
If you choose to use the DDO in your network, you do not have to use Oracle Network Manager to create configuration files. If you are using SQL*Net for the first time, and are willing to accept all default parameters, with the Dynamic Discovery Option, the only configuration file needed is a LISTENER.ORA for each listener. That file is created as part of the installation process.
The DDO in Oracle Names 2.0 is not for every network. There are several factors o consider before using DDO on your network.
|
|
LSNRCTL
LSNRCTL>STATUS [listener_name]where listener_name is the name of the listener defined in the LISTENER.ORA file. It is not necessary to identify the listener if you are using the default listener, named LISTENER.
If the STATUS command indicates the listener is running, continue to Step 2. If the listener is not running, skip to Step 3.
LSNRCTL>SET PASSWORD password
LSNRCTL>STOP [listener_name]SET PASSWORD is only required if the password is set in the LISTENER.ORA file. The password defaults to ORACLE.
LSNRCTL>QUIT
|
|
|
|
NAMES.DIRECTORY_PATH = (ONAMES, TNSNAMES)
AUTOMATIC_IPC = OFF
(ADDRESS_LIST =
# (ADDRESS=
# (PROTOCOL= IPC)
# (KEY= oracle.world)
# )
# (ADDRESS=
# (PROTOCOL= IPC)
# (KEY= ORCL)
# )
# (ADDRESS=
# (COMMUNITY= NMP.world)
# (PROTOCOL= NMP)
# (SERVER= hr-PC)
# (PIPE= ORAPIPE)
# )
(ADDRESS=
(COMMUNITY= TCP.world)
(PROTOCOL= TCP)
(Port= 1521)
)
(ADDRESS=
(COMMUNITY= TCP.world)
(PROTOCOL= TCP)
(Port= 1526)
)
)
SID_LIST_listener_name=
(SID_LIST =
(SID_DESC =
(SID_NAME = SID)
(GLOBAL_DBNAME = global_dbname.domain)
)
)
USE_PLUG_AND_PLAY_listener_name = ONUSE_PLUG_AND_PLAY indicates to use the DDO and GLOBAL_DBNAME identifies the globally unique name for the database instance. Think of it as a database alias.
NAMESCTL
NAMESCTL>STARTThe OracleNamesService is created and configuration is complete.
This section covers the following:
These instructions are valid for a network with or without an Oracle Names Server.
NAMESCTL
NAMESCTL>STATUSIf the STATUS command indicates the Oracle Names Server is running, continue to Step 3. If the Oracle Names Server is not running, continue to Step 2.
NAMESCTL>START
NAMESCTL>QUIT
If the service is not running, continue to Step 3. Otherwise, skip to Step 4.
Command Line To start the listener from the command line:
LSNRCTL
LSNRCTL>STATUS [listener_name]where listener_name is the name of the listener defined in the LISTENER.ORA file. It is not necessary to identify the listener if you are using the default listener, named LISTENER.
If the STATUS command indicates the listener is running, continue to Step 2. If the listener is not running, skip to Step 3.
LSNRCTL>SET PASSWORD password
LSNRCTL>STOP [listener_name]SET PASSWORD is only required if the password is set in the LISTENER.ORA file. The password defaults to ORACLE.
LSNRCTL>START [listener_name]
LSNRCTL>QUIT
If the listener is running, continue to Step 3. If the listener is running, skip to Step 4.
This section show how to execute:
A loopback uses SQL*Net to go from the server right back to itself. Performing a successful loopback verifies that SQL*Net works on the server.
Loopback with Server Manager
To execute a loopback using Server Manager:
SVRMGR23The SVRMGR> prompt appears:
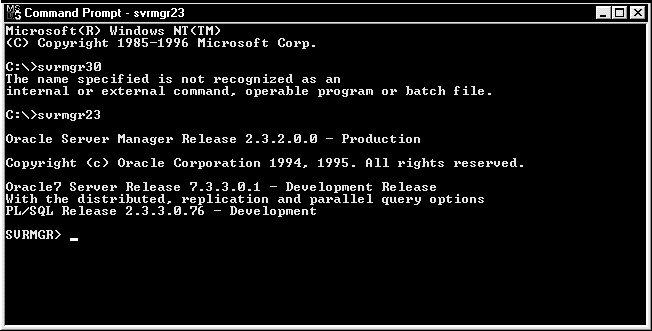
SVRMGR>CONNECT SYSTEM/MANAGER@service_nameor
SVRMGR>CONNECT SYSTEM/MANAGER@global_dbnameThe service_name is the database alias you defined earlier with SQL*Net Easy Configuration or the Oracle Network Manager and the global_dbname is the global database name you defined in the LISTENER.ORA for the Oracle Names Server.
Server Manager returns the following message:
Connected
For example, if your service name in the TNSNAMES.ORA file reads ORACLE.WORLD and the two .DEFAULT parameters are set to WORLD in the SQLNET.ORA file, the command to do a loopback is:
SVRMGR> CONNECT SYSTEM/MANAGER@oracleThe two parameters in SQLNET.ORA add a .WORLD extension to ORACLE, which matches the ORACLE.WORLD defined in the TNSNAMES.ORA file.
SVRMGR>EXITExiting Server Manager closes the database connection.
SQL>EXITExiting SQL*Plus closes the database connection.
Most TCP/IP transports attempt to use the DNS. DNS is a machine used to translate the host name specified in the TNSNAMES.ORA file into the host internet address (IP). If a Domain Name Server is present on your network and the TCP/IP vendor supports DNS, the host name is successfully translated to the host address. The host IP address can be determined by using the Control Panel's Network utility to access DNS information.
Depending on your vendor, workstation configuration, and network configuration, your TCP/IP software can also use a HOSTS file to map host names to Internet addresses if DNS is not detected or supported.
If DNS and the HOSTS file are unable to resolve the host name during a remote database connection, the following error message appears:
ORA-12545: TNS: name lookup failure
(HOST = server_name) section of the TNSNAMES.ORA so server_name is changed to the IP address of the server.The following sections explain how to determine the server's IP address and verify that DNS and the HOSTS file are working correctly.
The instructions below explain how to determine the IP address from Windows NT 4.0. The instructions are different on Windows NT 3.51. Please see your operating system documentation for specific DNS information.
|
|
To use PING:
PING server_namewhere server_name is the host name, alias, or Internet address of the server to which you are trying to connect. If your network in functioning correctly, the following message appears:
Reply from server_name: bytes=nn time=nnmsIf there is a problem, this message appears:
Request timed outOr:
Reply from server_name: Destination host unreachableThe following is a partial list of reasons why a host is inaccessible:
When you connect to a listener using TNSPING, an estimate of the round trip time in milliseconds appears. If TNSPING fails, a network error message appears without the overhead of a database connection.
To use TNSPING:
From the client, enter:
TNSPING service_name countwhere service_name is the database alias (or service name) and count is the number of times the program attempts to reach the server. count is optional.
The output looks like:
TNS Ping Utility for 32-bit Windows: Version 3.0.2.0.0 - Production on 12-DEC-
96 20:20:33
Copyright, 1996(c) Oracle Corporation 1995. All rights reserved.
Attempting to contact
(ADDRESS=(COMMUNITY=tcp.world)(PROTOCOL=TCP)(Host=server_name)(Port=1521))
OK (60 msec)
Command Line To stop Oracle Names from the command line:
NAMESCTL
NAMESCTL>STOP
NAMESCTL>QUIT
|
|
Command Line To stop the listener from the command line:
|
|
LSNRCTL
LSNRCTL>SET PASSWORD password
LSNRCTL>STOP [listener_name]where listener_name is the name of the listener defined in the LISTENER.ORA file. It is not necessary to identify the listener if you are using the default listener, named LISTENER.
SET PASSWORD is only required if the password is set in the LISTENER.ORA file. The password is defaulted to ORACLE.
LSNRCTL>QUIT
 |
Contents | Index |  |
 |
||||