Release 8.1.5
A68160-01
Library |
Product |
Contents |
Index |
| Legato Storage Manager Administrator's Guide Release 8.1.5 A68160-01 |
|
This chapter presents information about using LSM for Oracle backup and restore operations after you have configured the requisite LSM resources in the LSM Server. It provides general information on how to run Oracle backups and restores as well as details on LSM Server bootstrap backups. The methods for monitoring Oracle backups and restores by means of the LSM Administrator GUI and specific log files are also outlined.
The preceding chapters of this guide outline the procedures for configuring LSM for Oracle backup and restore operations. After applying the information in those chapters, you should have all the required client, server, device, and volume pool resources configured in the LSM Server. Also, you should have a labeled volume mounted in each configured backup device--or, if auto media management is enabled for a tape device, a tape loaded in the tape device for LSM to use automatically.
As explained in "Overview of LSM Features" , you can start an Oracle backup or restore by running one of the two following programs:
For information about using the command-line interface, see the following section,"Using the Oracle Backup/Restore Utility". For more information on using the GUI, see "Using the Oracle Enterprise Manager Backup Manager".
For important additional considerations for RMAN backups, see "Multiplexing During RMAN Backups".
You can use the command-line interface to issue the appropriate RMAN command to start a specific type of backup, restore, or recovery on your Oracle Server. The backup/restore utility interacts with LSM in performing the backup or restore operation, as explained in "Overview of Oracle Backup and Recovery System".
For details about using RMAN, refer to the Oracle8i Backup and Recovery Guide, or the comparable guide for Oracle8. This guide outlines the RMAN commands to use for starting different types of Oracle backup and restore operations. It also explains the prerequisite tasks to perform prior to using RMAN with LSM. The following tasks are among those outlined in the guide:
For RMAN backups using LSM, each backup piece (or LSM save set) must have a unique generated name.
As mentioned in the section "Generating Unique File Names" in the Oracle8i Backup and Recovery Guide must generate a unique name for each backup piece by means of the substitution variables (%d, %t, %s, %p, and %u) provided by Recovery Manager.
The format string specified in the
For example, if you back up two databases to one LSM server, and you use the format string %s%p in the backup command for both databases, the same piece names will be generated for both databases. In this case the database backup which started first will be deleted when the backup of the second database begins, as %s%p is not unique across databases.
Alternatively; if you use the format string ORA_%d_%u where %d is the database name and %u is a generated number, then each save set backed up with a unique name can be restored later without difficulty.
Note:
backup command or allocate channel command determines the name of the backup piece. If an RMAN backup using LSM generates a name that already exists in the LSM index database, the original backup save set with that name is deleted.
You can use the Oracle Enterprise Manager instead of the Oracle utility command-line interface to start an Oracle backup or recovery. The OEM Backup Manager is the graphical user interface to the Oracle backup/restore utility that enables you to perform backup and restore operations through a point-and-click method. The Oracle Enterprise Manager provides a much simpler interface for running Oracle backups and restores; it generates the required RMAN commands.
For complete information on using the Oracle Enterprise Manager, refer to the Oracle Enterprise Manager Administrator's Guide and the other Oracle Enterprise Manager documentation included with your product kit.
You must install the Oracle Enterprise Manager on a Windows NT system, which can be either the Oracle Server machine or a separate machine on the network.
It is possible to install and run the LSM Administrator GUI on the same Windows NT machine as the Oracle Enterprise Manager. (The LSM installation process automatically installs the LSM Administrator GUI on the Oracle Server.) You can use the LSM Administrator GUI to connect to the LSM Server and monitor the status of Oracle backup and restore operations.
To prevent LSM from multiplexing multiple RMAN backup sets to one tape drive, only allocate as many Recovery Manager "channels" as there are physical tape drives available to LSM.
Allocating more channels than physical tape drives will typically result in multiplexed RMAN backup sets to one drive, which may significantly add to the time required to restore from those backups. To clarify, the multiplexing performed by LSM (when allocating more channels than physical devices) would be in addition to the multiplexing automatically performed by Recovery Manager.
The target sessions attribute of a device resource configured in the LSM Server is described in "Adding a Device Resource on UNIX" or "Adding a Device Resource on Windows". The target sessions value is not a hard limit on the number of sessions that will run concurrently on the device. It defines the number of sessions that LSM allocates to a device before using the next device.
If more concurrent backup sets are created than the number of available devices, LSM will multiplex those backup sets onto the available devices, up to the maximum number of sessions specified in the parallelism value of the server resource.
The target sessions value defaults to 1 for devices created during the initial installation of LSM. For devices created afterwards, the target sessions value defaults to 4. If you do not want LSM to multiplex multiple channels to those devices, you must change the target sessions value to 1 when adding a device after LSM has been installed.
Note that the "client parallelism" attribute does not apply to LSM sessions initiated by Recovery Manager.
As mentioned in "Overview of LSM Operations" , the LSM Server is preconfigured to perform a special automatic backup--the LSM Server bootstrap backup--every day at 3:33 a.m. The bootstrap consists of the following three files from the LSM Server:
The bootstrap is a special backup set essential for disaster recovery procedures of the LSM Server. LSM writes the bootstrap file to the backup media and generates a report about the success of the bootstrap backup. LSM sends an automatic notification to the administrator about the bootstrap backup and displays the same information in the LSM Administrator GUI. Also, bootstrap information is sent to a printer on the LSM Server.
You can also run the bootstrap backup manually. For example, after finishing the last of many Oracle backups performed during a day, it would be advisable to manually run a bootstrap backup, to ensure that you have an up-to-date bootstrap. An up-to-date bootstrap is essential for a complete disaster recovery on the Oracle Server.
The next section, "Automatic Bootstrap Backup", contains instructions about how to verify that the LSM Server is properly configured for the automatic bootstrap backup. For information about how to run the bootstrap backup manually, see "Manual Bootstrap Backup". "Maintaining Bootstrap Information" has details about the critical bootstrap information you need to keep for future disaster recovery procedures.
Chapter 5, "Disaster Recovery" contains complete details about how to use the LSM Server bootstrap during a disaster recovery on the Oracle Server.
To verify that the LSM Server configuration is properly set up for the automatic bootstrap backup, you need to run the LSM Administrator GUI. See "Using the LSM Administrator GUI" for details about running the GUI on either a UNIX or Windows system.
Then, you need to verify that the client resource and Default group resource are both configured correctly. For information about accessing the client resource, see "Client Resource" . In the client resource, be sure that the Group attribute is set to Default.
Finally, check the Default group resource configuration. Open the Groups window by one of the following methods, depending on the type of system running the GUI:
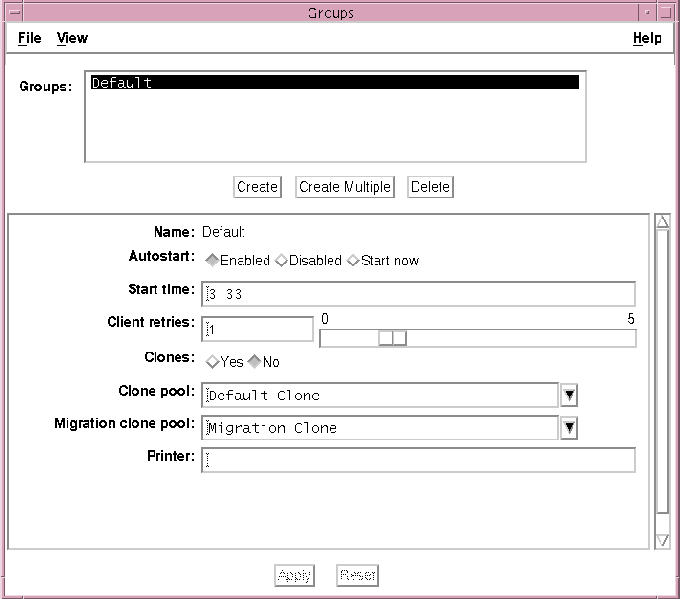
The Groups window lists the single group resource, with the name Default. On a UNIX system, the Groups window also shows all the attribute settings of the group resource.
On a UNIX system, the Groups window is displayed as shown in Figure 4-1.

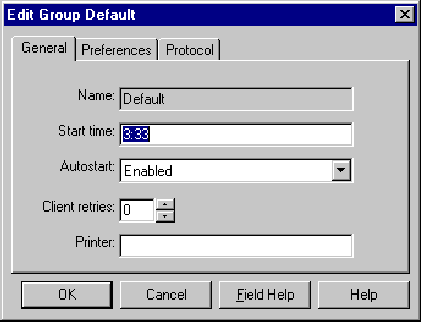
On a Windows system, the Groups window does not automatically show the attribute settings of the group resource, so you must perform the following additional steps to see the group's attributes:
The Edit Group dialog box on a Windows system, listing all the attributes of the group resource, is displayed as shown in Figure 4-2.

The Start time attribute specifies when the bootstrap backup is configured to begin--3:33 a.m. by default. To have the bootstrap information sent to a specific printer, set the Printer attribute to the name of that printer.
Note that information confirming the completion of the automatic bootstrap backup is displayed in the LSM Administrator GUI. It's in the Messages section of the main LSM Administrator window on a UNIX system or in the Messages section of the Monitor window on a Windows system.
If you want to manually run the bootstrap backup, you must be root on the LSM Server on a UNIX system or Administrator on a Windows NT system. Then, to run the manual backup, enter this savegrp command at the system prompt:
savegrp -O -l full -P printer_name -c server_name
Here, printer_name is the name of the printer where the bootstrap information is printed at the end of the bootstrap backup. Also, server_name is the hostname of the LSM Server.
On UNIX, refer to the savegrp manual page for information about the savegrp command and its options. On Windows NT, refer to savegrp in the Command-Line Utilities Help provided with LSM on Windows NT. See "Windows Command-Line Utilities Help" for details about using the Command-Line Utilities Help.
Note that information confirming the completion of the manual bootstrap backup is displayed in the LSM Administrator GUI. It's in the Messages section of the main LSM Administrator window on a UNIX system or in the Messages section of the Monitor window on a Windows system.
At the end of the automatic daily bootstrap backup, LSM prints the bootstrap information to the printer specified in the Printer attribute of the Default group resource; or, if that Printer attribute is blank, to the default printer.
At the end of a manual bootstrap backup run with the savegrp command, as described in "Manual Bootstrap Backup", the bootstrap information is sent to the printer specified in that savegrp command.
Be sure to store the bootstrap printout in a safe place. The printed bootstrap information includes dates, locations, and save set ID numbers for the bootstrap save sets backed up during the past month. With this information, you can determine which volumes are needed to recover the LSM Server indexes and resource database files during a disaster recovery.
An example of a bootstrap printout is as follows:
August 20 03:30 1997 LSM bootstrap information Page 1
date     time     level  ssid        file  record  volume
8/19/97  2:29:08  9      1148868949  56    0       jupiter.005
8/20/97  2:52:25  9      1148868985  77    0       jupiter.001
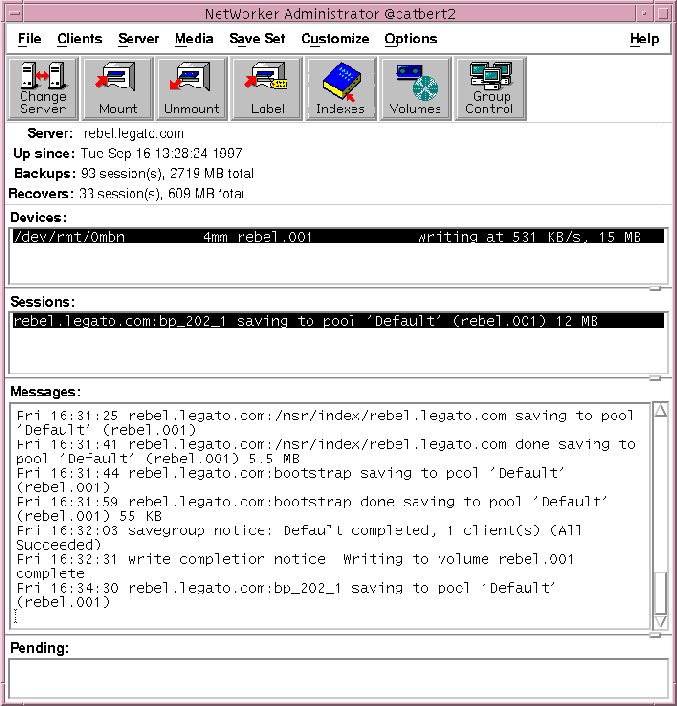
You can use the LSM Administrator GUI to monitor the status of Oracle backup and restore operations. In the GUI on UNIX, the messages are displayed in the Sessions and Messages sections of the main LSM Administrator window. In the GUI on Windows NT, the messages appear in the Monitor window.
You can view progress messages that appear during the backup and completion messages that advise when the backup is complete. You can also view the messages in specific online system files.
The following example shows the types of messages displayed in the Sessions and Messages sections of the main LSM Administrator window on UNIX during Oracle backups.
