Release 8.1.5
A67440-01
Library |
Product |
Contents |
Index |
| Net8 Administrator's Guide Release 8.1.5 A67440-01 |
|
This chapter describes coexistence of SQL*Net and Net8, migration and upgrades. Specific topics discussed are:
When dealing with SQL*Net to Net8 migration, keep the following features in mind:
| This Feature... | SQL*Net | Net8 |
|---|---|---|
|
Multiple Protocol Support |
Multi-Protocol Interchange allows applications in TNS networks to communicate across different protocols. |
The Oracle Connection Manager has a multi-protocol support feature which allows client and database servers operating on different protocol stacks to communicate with each other. Additional Information: See "Enabling Multi-Protocol Support". |
|
Configuration Tools |
SQL*Net provides: |
Net8 provides: |
|
External Procedures |
n/a |
Support for external procedure, a function or procedure written in a third-generation language (3GL) that can be called from PL/SQL code. |
Though it is not required, migrating your network to Net8 is recommended for the following reasons:
Net8 simplifies the process of setting up your network components. With Net8, you can start a client, network listener, Oracle Names server, and Oracle Connection Manager with default settings. This minimizes the need to create and maintain configuration files.
As a part of the installation process, the Net8 Configuration Assistant configures the basic parameters in the Net8 configuration files needed for simple environments.
With Net8, the Net8 Assistant replaces most of the functionality previously provided with Oracle Network Manager. Use the Net8 Assistant to create or modify your existing TNSNAMES.ORA local naming files, SQLNET.ORA profiles, LISTENER.ORA listener files, and NAMES.ORA Oracle Names configuration files.
The table below lists the networking features supported in each Oracle release.
| Database Release | 7.1.4 | 7.1.5 | 7.1.6 | 7.2.2 | 7.2.3 | 7.3.2 | 7.3.3 | 7.3.4 | 8.x |
|---|---|---|---|---|---|---|---|---|---|
|
SQL*Net |
2.1.4 |
2.1.5 |
2.1.6 |
2.2.2 |
2.2.3 |
2.3.2 |
2.3.3 |
2.3.4 |
n/a |
|
Oracle Names server |
1.0 |
1.0 |
1.0 |
1.1 |
2.0 |
2.0.2 |
2.0.3 |
2.0.4 |
8.x |
|
Oracle Advanced Networking Option |
n/a |
n/a |
n/a |
n/a |
n/a |
2.3.2 |
2.3.3 |
2.3.4 |
8.0.x |
|
Oracle Advanced Security |
n/a |
n/a |
n/a |
n/a |
n/a |
n/a |
n/a |
n/a |
8.1.x |
|
Secure Network Services1 |
1.0.1 |
1.0.2 |
1.0.3 |
1.1 |
2.0 |
n/a |
n/a |
n/a |
n/a |
|
Net8 |
n/a |
n/a |
n/a |
n/a |
n/a |
n/a |
n/a |
n/a |
8.x |
|
1
The functionality of Secure Network Services and SQL*Net/DCE are now included in the Oracle Advanced Networking Option and Oracle Advanced Security option. |
The following SQL*Net parameter are no longer functional in Net8:
You may choose to delete these parameters or leave them. Though they are no longer required, they will not interfere with any network operations.
Consider the following client-to-database connection issues before you decide if upgrading or migrating is appropriate for you environment:
As Figure 5-1 depicts, an Oracle8i Client release 8.1 requires Net8 Client release 8.1, and an Oracle8i release 8.1 database requires Net8 Server release 8.1:
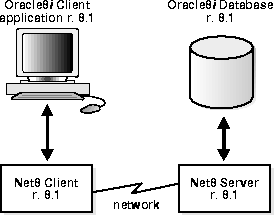
The Oracle8i Client must be configured with a service name, as described in "Configuring the Network with the Local Naming Method".
As Figure 5-2 depicts, an Oracle8i Client release 8.0 requires a compatible release of Net8 Client, an Oracle7 Client requires SQL*Net Client, and an Oracle8i database requires Net8 Server release 8.1.
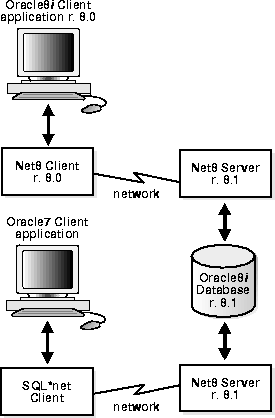
While is not necessary to replace the Oracle System Identifier (SID) of the database with its service name, Oracle recommends doing so to take advantage of new functionality. For example:
net_service_name=
(description=
  (address=...)
  (address=...)
  )
  (connect_data=
   (service_name=sales.com)===
  )
This effect may be accomplished by replacing SID=SID with SERVICE_NAME=SERVICE_NAME with the Net8 Assistant's compatibility mode. See "Using the Net8 Assistant to Handle Compatibility Issues".
Consider the following questions for an environment with Oracle7 clients connecting to an Oracle8i release 8.1 database:
No. You must rebuild or upgrade applications to work with Net8 libraries.
No. If an Oracle7 client needs to connect to a remote Oracle8i database, only SQL*Net Client release 2.x has to be configured on the Oracle7 client. Net8 is backward compatible with SQL*Net release 2.x. The only limitation is that the new network features available with Net8 are unavailable with this connection type.
Yes. If the Oracle7 client needs to connect to a local Oracle8i database, you have SQL*Net Client release 2.x, Net8 Client, and Net8 Server in the same system. Note that Net8 Client and Net8 Server are already installed during the installation of Oracle8i Enterprise Edition or Oracle8i.
As depicted in Figure 5-3:
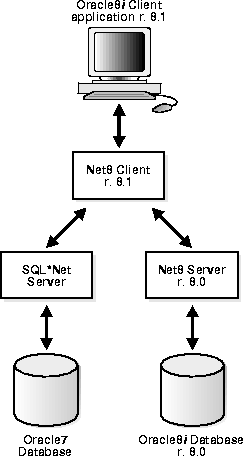
The release 8.1 clients must be configured with the SID of the database. For example, the TNSNAMES.ORA would have the following effect:
net_service_name=
(description=
  (address=...)
  (address=...)
  )
  (connect_data=
   (sid=sales)
  )
This effect may be accomplished with the Net8 Assistant's compatibility mode. See "Using Release 8.0/7.x Features and Connecting To a Release 8.0/7.x Service".
Additionally, the LISTENER.ORA on the database server must still be configured with the description of the SID, as described in "Configuring a Listener with Service Information".
Consider the following questions for an environment with Oracle8i clients release 8.1 connecting to an Oracle7 database.
No. If an Oracle8i client needs to connect to a remote Oracle7 database, only Net8 Client needs to be configured on the Oracle8i client. SQL*Net release 2.x is upwards compatible with Net8. The only limitation is that the new network features available with Net8 are unavailable with this connection type.
Yes. If the Oracle8i client needs to connect to a local Oracle7 database, you need both SQL*Net Server release 2.x and Net8 Client on the same system.
If you are migrate or upgrade all or part of your network to Net8, you should migrate or upgrade all the Oracle Names Servers in the region to version 8.
Yes.
Yes, if the connect string was specified correctly when it was entered into Oracle Names. In other words, if the connect string worked from a TNSNAMES.ORA file, it will work from Oracle Names.
Because some parameters are enabled only for release 8.1, the Net8 Assistant offers two options that permit you set the proper parameters in the TNSNAMES.ORA file for Net8 release 8.1 clients or Net8 release 8.0/SQL*Net release 2.x clients:
| Net8 Assistant option | Description |
|---|---|
|
Use Options Compatible with Net8 8.0 Clients |
Allows you to enable or disable release 8.1 options for multiple addresses. If turned ON, allows you to only select the Oracle Connection Manager parameter, SOURCE_ROUTE, for pre-release 8.1 client connections. If turned OFF, allows you to enable or disable SOURCE_ROUTE, LOAD_BALANCE and FAILOVER parameters for release 8.1 client connections. Additional Information: See "Configuring Multiple Address Options". |
|
Use Oracle8i Release 8.0 Compatible Identification |
Allows you to enable or disable release 8.1 advanced options for the CONNECT_DATA section of the TNSNAMES.ORA. If turned ON, allows you to enter the SID of the pre-release 8.1 database. If turned OFF, allows you to enter the release 8.1 service name (SERVICE_NAME). Note: The Advanced Service Options dialog box, which is visible when the Advanced button in the Service Identification group is chosen, is also impacted by whether this option is turned ON or OFF. Some settings are only available for connections to a release 8.1 service. Additional Information: See "Configuring Advanced Connection Attributes for a Net Service Name". |
If using older configuration files prior to release 8.1, the TNSNAMES.ORA may be modified to take advantage of new features or to connect to a release 8.1 service. These changes can be made manually to the TNSNAMES.ORA file or with the Net8 Assistant.
To configure old configuration files for release 8.1 features, use either the Net8 Assistant:
The Address List Options dialog box appears:
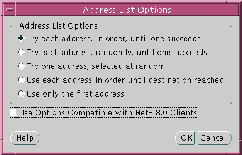
See "Configuring Multiple Address Options" for further information about the options.
The service name is typically the global database name, a name comprised of the database name and domain name, entered during installation or database creation.
For further information about the service name value, see:
- "Setting Service Names and Instance Names" and "Step 1: Verify Service Name and Instance Name" to set the service name
- "Configuring Advanced Connection Attributes for a Net Service Name" for more information about optional connection settings
The Net8 Assistant application exits.
If configuring a client to connect to a release 8.0 or release 7.x service, the TNSNAMES.ORA must be configured with the SID of database.
To configure release 8.0 features, use either the Net8 Assistant or manually modify the TNSNAMES.ORA file:
The Address List Options dialog box appears:
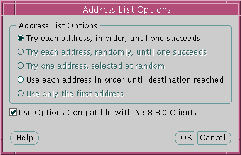
See "Configuring the Client for Oracle Connection Manager Features" for further information about configuring Oracle Connection Manager.
The Net8 Assistant application exits.
When installing Net8, you have these installation decisions to make:
To upgrade from Net8 release 8.0 to Net8 release 8.1 or migrate from SQL*Net release 2.x to Net8 release 8.1, follow these tasks:
Step 1: Verify Service Name and Instance Name
Step 2: Perform Software Upgrade or Migration on the Server
Step 3: Perform Software Upgrade or Migration on the Client
If you want to take advantage of the Net8 release 8.1 feature to identify a service and its instance in the TNSNAMES.ORA file, ensure the SERVICE_NAMES and INSTANCE_NAMES parameters are set in the database initialization file (INITSID.ORA).
To perform a software upgrade or migration on the database server:
Install the latest release of Net8 Server from the Oracle Universal Installer to receive the latest executables.
If Net8 Sever is installed with the Oracle8i database, you are prompted to upgrade a database with the Oracle Data Migration Assistant if the Oracle Universal Installer detects a release 8.0 database on your system. If you do not want to upgrade during the installation process, you can choose to install this assistant and use it later.
The Oracle Universal Installer automatically performs these tasks:
To perform a software upgrade or migration on the client
Install the latest release of Net8 Client from the Oracle Universal Installer to receive the latest executables.
After the software is upgraded and migration, it is not required to upgrade the configuration files unless you want to use the new release 8.1 features. To take advantage of new features:
| For this configuration file... | Perform the following... |
|---|---|
|
SQLNET.ORA on clients and server |
Remove AUTOMATIC_IPC, the parameter to force session to use IPC, as it will be ignored. |
|
TNSNAMES.ORA |
Replace SID with the SERVICE_NAME parameter to connect to a release 8.1 service. net_service_name= (description= (address=...) (address=...) ) (connect_data=(service_name=sales.com)) The SERVICE_NAME is typically the global database name, a name comprised of the database name and domain name, entered during installation or database creation. Additional Information: See:
|
|
|
Enable client load balancing and/or connect-time failover. Additional Information: See:
|
|
LISTENER.ORA |
Because instance information is registered with the listener in release 8.1, it is no longer necessary to include the instance information with the SID_LIST_listener_name section of the LISTENER.ORA file. However, many management tools, including Oracle Enterprise Manager, still require this information for release 8.1.5. If you are using Oracle Enterprise Manager to manage database objects, the LISTENER.ORA file must be configured with information about the database in the following manner: sid_list_ Implementing connect-time failover does not allow use of static service configuration parameters in the LISTENER.ORA file. However, static configuration is required for Oracle8i release 8.0 or Oracle7 databases and Oracle Enterprise Manager. For further information about statically configuring the listener, see "Configuring a Listener with Service Information". See the Oracle8i Parallel Server Setup and Configuration Guide for additional configuration instructions on setting up connect-time failover for Oracle Parallel Server in an Oracle Enterprise Manager environment. Additional Information: See "Configuring a Listener with Service Information" |
See the next section, "Additional Considerations for Oracle Connection Manager and Oracle Names", for additional Oracle Connection Manager and Oracle Names migration issues.
If you are currently using Oracle Multi-Protocol Interchange or Oracle Names, review the following topics:
The Oracle Connection Manager's administrative process, CMADMIN, is used by the CMCTL control utility to execute administrative commands.
In release 8.1, new configurations require a protocol address for CMADMIN. By default this address is:
cman_admin=
 (address=
  (protocol=tcp)
  (host= host)
  (port=1830)
 )
Oracle Connection Manager release 8.1 is backwards compatible with release 8.0. This implies that:
If you have migrated your clients to Net8, and you still require multi-protocol support, you will need to install Oracle Connection Manager, and route your sessions through it. Oracle Multiprotocol Interchange is no longer supported past SQL*Net release 2.3.
To ensure proper functioning of Oracle Connection Manager, verify that you have deleted the following files on those nodes:
Other migration considerations are specific to your network configuration.
See "Enabling Multi-Protocol Support", for further information about multi-protocol support.
Oracle Names version 8 is backward compatible with SQL*Net version 2. This implies that clients running on SQL*Net version 2 can access Oracle Names servers using Oracle Names version 8 to connect to an Oracle8i database.
If you wish to take advantage of the new features provided with Oracle Names version 8, you must migrate all of your existing Names Servers in a region to version 8 by installing Oracle Names version 8 on every existing Names Server node.
Migration issues to keep in mind include:
To migrate and transfer data from an existing Oracle Names server database to a version 8 database, run the NAMESUPG.SQL script located in $ORACLE_HOME/network/admin on UNIX and ORACLE_HOME\network\admin on Windows NT on the node where Oracle Network Manager stored your network definition:
sql> CONNECTuser/passwordsql> @oracle_home/network/admin/namesupg.sql;
The procedure to migrate Oracle Names version 2 with the Dynamic Discovery Option is dependent upon whether nor not you want Oracle Names version 8 to store information in a region database.
If you migrate to a Oracle Names version 8 from Oracle Names version 2 with the Dynamic Discovery Option, the new Oracle Names server should be able obtain registered data from the old checkpoint files. If for some reason data is not registered, you can register objects, following the procedures in "Step 5: Configure the Listener" to configure the listener properly with the USE_PLUG_AND_PLAY parameter and "Step 6: Register Data with the Oracle Names Server" to register objects.
If you were previously running Oracle Names version 2 using the Dynamic Discovery Option, and you want to configure a database as a repository for your Oracle Names information, you will need to:
namesctlnamesctl> dump_tnsnames
$ORACLE_HOME/network/admin on UNIX and ORACLE_HOME\network\admin on Windows NT on the Oracle Names Server node where you want the database to reside:
sql> CONNECTuser/passwordsql> @oracle_home/network/admin/namesini.sql;
Oracle Names version 8 does not support older configurations that use Resource Object Store (ROS) files (ROSFILES). ROSFILES must be migrated directly into Oracle Names database tables or first intoTNSNAMES.ORA files and then into Oracle Names.
To migrate ROSFILES to database tables:
sql> CONNECT system/password
sql> CREATE USER user
    identified by password
    default tablespace users
    temporary tablespace temp;
sql> GRANT sysdba to username identified by password;
sql> CONNECTuser/passwordsql> @oracle_home\dbs\rosbild.sql; sql> @oracle_home\dbs\nmcbild.sql; sql> @oracle_home\dbs\rosgrnt.sql; sql> @oracle_home\dbs\nmcgrnt.sql;
$ORACLE_HOME/network/admin on UNIX and ORACLE_HOME\network\admin on Windows NT:
sql> CONNECTuser/passwordsql> @oracle_home/network/admin/namesupg.sql;
To migrate ROSFILES to a TNSNAMES.ORA file, and then import the TNSNAMES.ORA file into Oracle Names:
See also the following documentation:
The following checklist is provided to ensure proper migration to Oracle Names version 8.